Quantcast
Channel: Use cases – The OTRS Blog
Viewing all 45 articles
Browse latest View live

Conform to international standards; use OTRS for Process Management

$
0
0

The Back Story

Business Process Model and Notation, BPMN for short, allows you to visualize the process model. A process model, written in BPMN, is an XML file at its heart. This XML format is well defined and maintained by the Object Management Group. This XML is deigned for portability, to be executable, and is currently the leading industry standard format (ISO/IEC 19510:2013). Business Process Management Suites (BPMS) and other tools use this to exchange processes. This means that most of these tools can read and or generate BPMN. Read how OTRS is leveraging this standard.

When designing a process, it should be clear to business users what is happening. This means the tasks involved and the performers are graphically represented. BPMN 2.0 has an entire library of standardized visual elements and terminology which OTRS leverages now to better conform to this standard.

BPMN describes the following two objects (narrowing it down a bit ;)) which OTRS is has adopted.

Task Objects: User, Script, Service (others not currently addressed)
Sequence Flow

In ((OTRS)) Community Edition, you have the possibility to configure:

Activities
Activity Dialogs
Transitions
Transition Actions

Automation of the workflow takes place in the transition and transition actions.

In OTRS, we now talk about

Task Activities
User Task Activity Dialogs
Sequence Flows
Sequence Flow Actions

So far no big change. We see now that OTRS uses the standard names for two elements vs. re-inventing the wheel. This makes it easier for your business team to talk with the OTRS administrators and makes integration tasks much easier. The real magic comes when we create a Task.

A Task in ((OTRS)) Community Edition is always a User Task.

A Task in OTRS can be a User, Script, or Service Task.

This means, that you can now visualize all of the elements of automation within the process manager canvas. Based on the user input of any Task, the Sequence Flow will determine the next Task. Changes in ticket data done via a Script Task (or specially programmed functions like Sending an Email), or calls to foreign systems via a Service Task, are not only presented to the process designer for ease and speed of design and troubleshooting, but notification of such tasks are now seen by agents when the system is performing them, or during errors.

Task Wokring


Taks Failed

A fully visual process, only with OTRS.

We still have some tool specifics which we will be adapting to support the standard better in the future, but for now: Service Desk Management Automation has never been easier and more compliant that with OTRS.


The post Conform to international standards; use OTRS for Process Management appeared first on The OTRS Blog.


You can delegate authority but not accountability.

$
0
0

Rowing is a good sport which shows the relationship between accountability and responsibility. The coxswain (or simply the cox) is the team member who sits in the boat facing the bow, steering the boat, and coordinating the power and rhythm of the rowers. This member is accountable for the speed and direction of the boat, and making sure that it reaches its goal safly and quickly.

Like the coxswain, leaders take on more responsibility for customers today than ever before due to the growing complexity of services and the technical demands of customers. As companies are streamlined, responsibilities grow; this requires delegating of tasks to make sure the services sold are actually delivered. OTRS challenges your service desk leaders to be accountable and provides them the tools to do so.

Your team is, in many cases, globally active. You may have a smaller team led by a single indivdual or a larger team led by multiple individuals: in both cases, the leader is responsible for said team. The act of delegating gives authority to the team to provide service to the customer. This can range from sharing knowledge and resources to specialized authority, like discounting or performing out-of-the-ordinary service to make the customer happy and solve an issue. These leaders are, however, still accountable for the success or failure of the team with respect to providing the service promised to the customer.

This is where the OTRS Feature Add-on known as Queue Responsible can help. In its uncustomized state, OTRS can assign ownership of tickets to agents. This is the delegation of authority from a leader to a team member, but by transferring the ticket in this way, it does not address the need for leaders to remain ultimately responsible. Similary, OTRS uses Queues to help direct the work to the best, or most appropriate, team to deal with the customer request. While the routing helps facilitate the delegation of authority, this also doesn’t tell us who is accountable for the work.

Using the OTRS Feature Add-on Queue Responsible, it is now possible to make leaders accountable for their team by automatically assigning them as the person responsible for tickets within queues for which they are responsible.

Requirements:
OTRS or OTRS On-Premise

As a user of OTRS, you may install the Feature Add-on Queue Responsible, whereby all tickets created or moved into a queue will automatically designate a defined agent, presumably the team leader, as responsible.

An added benefit is that reports can then be used to better aid decision making based on ticket states, types, services, escalations and now the responsible party.

The responsible manager can always have his or her eye on things by using the responsible view, and can react appropriately without having to do the task themselves or asking for status updates on tickets.

This is a truly useful tool for management to keep on top of the status of service delivery. So, if you’re currently running OTRS or OTRS On-Premise, take a look at this Feature Add-On and talk to your service team if you need help with configuration.

NOTE: Currently using ((OTRS)) Community Edition – our open source and free software? Contact sales@otrs.com to discuss upgrading: you’ll get access to support and many additional Feature Add-Ons like Queue Responsible.

The post You can delegate authority but not accountability. appeared first on The OTRS Blog.

Running OTRS on FreeBSD

$
0
0

FreeBSD is an open source UNIX®-like operating system that runs on several platforms. It is available free-of-charge to companies around the world under the standard BSD license. This means that companies have the option of distributing work that they’ve created based on FreeBSD without including the source code, if they chose to.

While “free” is certainly a compelling reason for technology professionals to leverage FreeBSD, there are even greater technological advantages to its use. The OS includes mature base code that has been consistently enhanced for more than 20 years by its extensive community. FreeBSD focusses on features, speed, and stability: It performs smoothly under heavy loads and efficiently manages memory; employs modern security features, like firewalls and jails; incorporates all modern networking protocols; and is relatively easy to administer.

Given its cost (or lack of) as well as its focus on stability and security, FreeBSD has become widely used by technology professionals in a wide variety of disciplines. It can handle nearly any task, from servers and desktops to embedded and appliance applications, without any perceivable degradation of speed. Because of its wide-spread use, it is important for OTRS 7 to run smoothly on FreeBSD.

The following outlines how to install OTRS 7 on FreeBSD. Additional details can be found in the official OTRS installation manual on doc.otrs.org.

OTRS 7 Installation on FreeBSD

For this installation, we use Apache2 and MySQL. At a minimum, you will need a FreeBSD installation with a working network connection. We use ports and do not compile on our own; we use pkg to keep things simple.

Step 1: Start with the Ports

Logon with your root account, fetch the portsnap,
root@freebsd:/ # portsnap fetch && portsnap extract

and compile pkg.
root@freebsd:/ # cd /usr/ports/ports-mgmt/pkg/ && make install clean

If needed, convert it into:
root@freebsd:/ # pkg2ng

Now you can create a user in the group wheel.
root@freebsd:/ # adduser
root@freebsd:/ # pw groupmod wheel -m

Then create the /opt/ directory,
root@freebsd:/ # mkdir /opt

and fetch the latest ports.
root@freebsd:/ # portsnap fetch update

Step 2: Install Apache2

Now you have to install Apache2.
root@freebsd:/ # pkg install apache24

To run Apache HTTP Server from startup, add apache24_enable=”yes” in your /etc/rc.conf. This can be done manually or with sysrc apache2_enable=yes.

Start the webserver to begin the test.
root@freebsd:/ # service apache24 start

Step 3: Install the MySQL Database

If steps one and two are working, you can install the database next. In this case, we are using MySQL.
root@freebsd:/ # pkg install mysql57-server

To run MySQL from startup, add mysql_enable=”yes” in your /etc/rc.conf. This can be done manually or with sysrc mysql_enable=yes

Step 4: Install the Packages

The Perl packages are tricky, but they can easily found with
pkg search | grep p5

Via command, you can install the packages you need.
root@freebsd:/ # pkg install ap24-mod_perl2 p5-CryptX p5-Archive-Zip p5-Digest-Bcrypt p5-Crypt-SSLeay p5-DateTime p5-DBD-mysql p5-EV p5-JSON p5-JSON-XS p5-Moose p5-DBD-LDAP p5-Net-DNS p5-Template p5-Search-Elasticsearch p5-YAML p5-YAML-LibYAML p5-libxml p5-XML-LibXML p5-XML-XSLT p5-XML-LibXSLT p5-Text-CSV_XS p5-Template-Toolkit

If you miss modules, you can install them via cpan.
root@freebsd:/ # cpan Date::Format

Depending on the installation, if the Perl path is not recognized, then a symbolic link may be helpful.
root@freebsd:/usr/bin # ln -s /usr/local/bin/perl perl

Step 5: Adding OTRS Configurations

Now create an OTRS user.
root@freebsd:/ # adduser otrs

And activate Apache modules in
/usr/local/etc/apache24/modules.d/260_mod_perl.conf

Then enable the mod_perl
LoadModule perl_module       libexec/apache24/mod_perl.so

in
/usr/local/etc/apache24/httpd.conf

And enable the proxy modules
LoadModule proxy_module libexec/apache24/mod_proxy.so
LoadModule proxy_http_module libexec/apache24/mod_proxy_http.so
LoadModule proxy_wstunnel_module libexec/apache24/mod_proxy_wstunnel.so

Now configure the Apache conf file
root@freebsd1:/usr/local/etc/apache24/extra:/# ln -s /opt/otrs/scripts/apache2-httpd.include.conf ./zzz_otrs.conf

and include the file in /usr/local/etc/apache24/httpd.conf

Include etc/apache24/extra/zzz_otrs.conf

Then, try to start Apache with the new configuration
root@freebsd:# apachectl restart

Note: be sure to test your current setup. If you browse to your /otrs/index.pl, then an error will occur, but the error is fine at this point.
The error message:
“Service Unavailable
The server is temporarily unable to service your request due to maintenance downtime or capacity problems. Please try again later.”

At this point, it is OK to continue with your installation steps and set file permissions
root@freebsd:# perl /opt/otrs/bin/otrs.SetPermissions.pl –admin-group=wheel

Now install Elasticsearch
root@freebsd: # pkg install elasticsearch6 p5-Search-Elasticsearch
root@freebsd: # /usr/local/lib/elasticsearch/bin/elasticsearch-plugin install –batch ingest-attachment
root@freebsd: # /usr/local/lib/elasticsearch/bin/elasticsearch-plugin install –batch analysis-icu

And enable Elasticsearch in /etc/rc.conf.
elasticsearch_enable=”YES”

Then start the service.
root@freebsd: # service elasticsearch start

Wait several seconds and then test the connection.
[otrs@freebsd ~]$ /opt/otrs/bin/otrs.Console.pl Maint::DocumentSearch::Check

The connection should be successful and the following message should appear:

Getting cluster information…
+———+————————+
| Cluster | elasticsearch |
| UUID | Px2wtqcyRlumLrXKpchvzA |
| Status | Green |
+———+————————+

Getting nodes information…

+———————–+————————+
| Node | eZRpjTv |
| UUID | eZRpjTvDSxGbx3LvFnSzrg |
| Master | Yes |
| Elasticsearch version | 6.4.2 |
| JVM version | 1.8.0_192 |
| Required Plug-ins: | |
| analysis-icu | Installed |
| ingest-attachment | Installed |
| Status | On-line |
+———————–+————————+

The database is set up identically to all other Linux distributions. If you need additional help with the database setup, visit:
https://doc.otrs.com/doc/manual/installation/stable/en/content/installation.html#mysql-or-mariadb

Step 6: Finishing Up

Finally, install Python and NPM. Update the NPM.
root@freebsd: # pkg install openjdk
root@freebsd: #npm install -g npm@latest

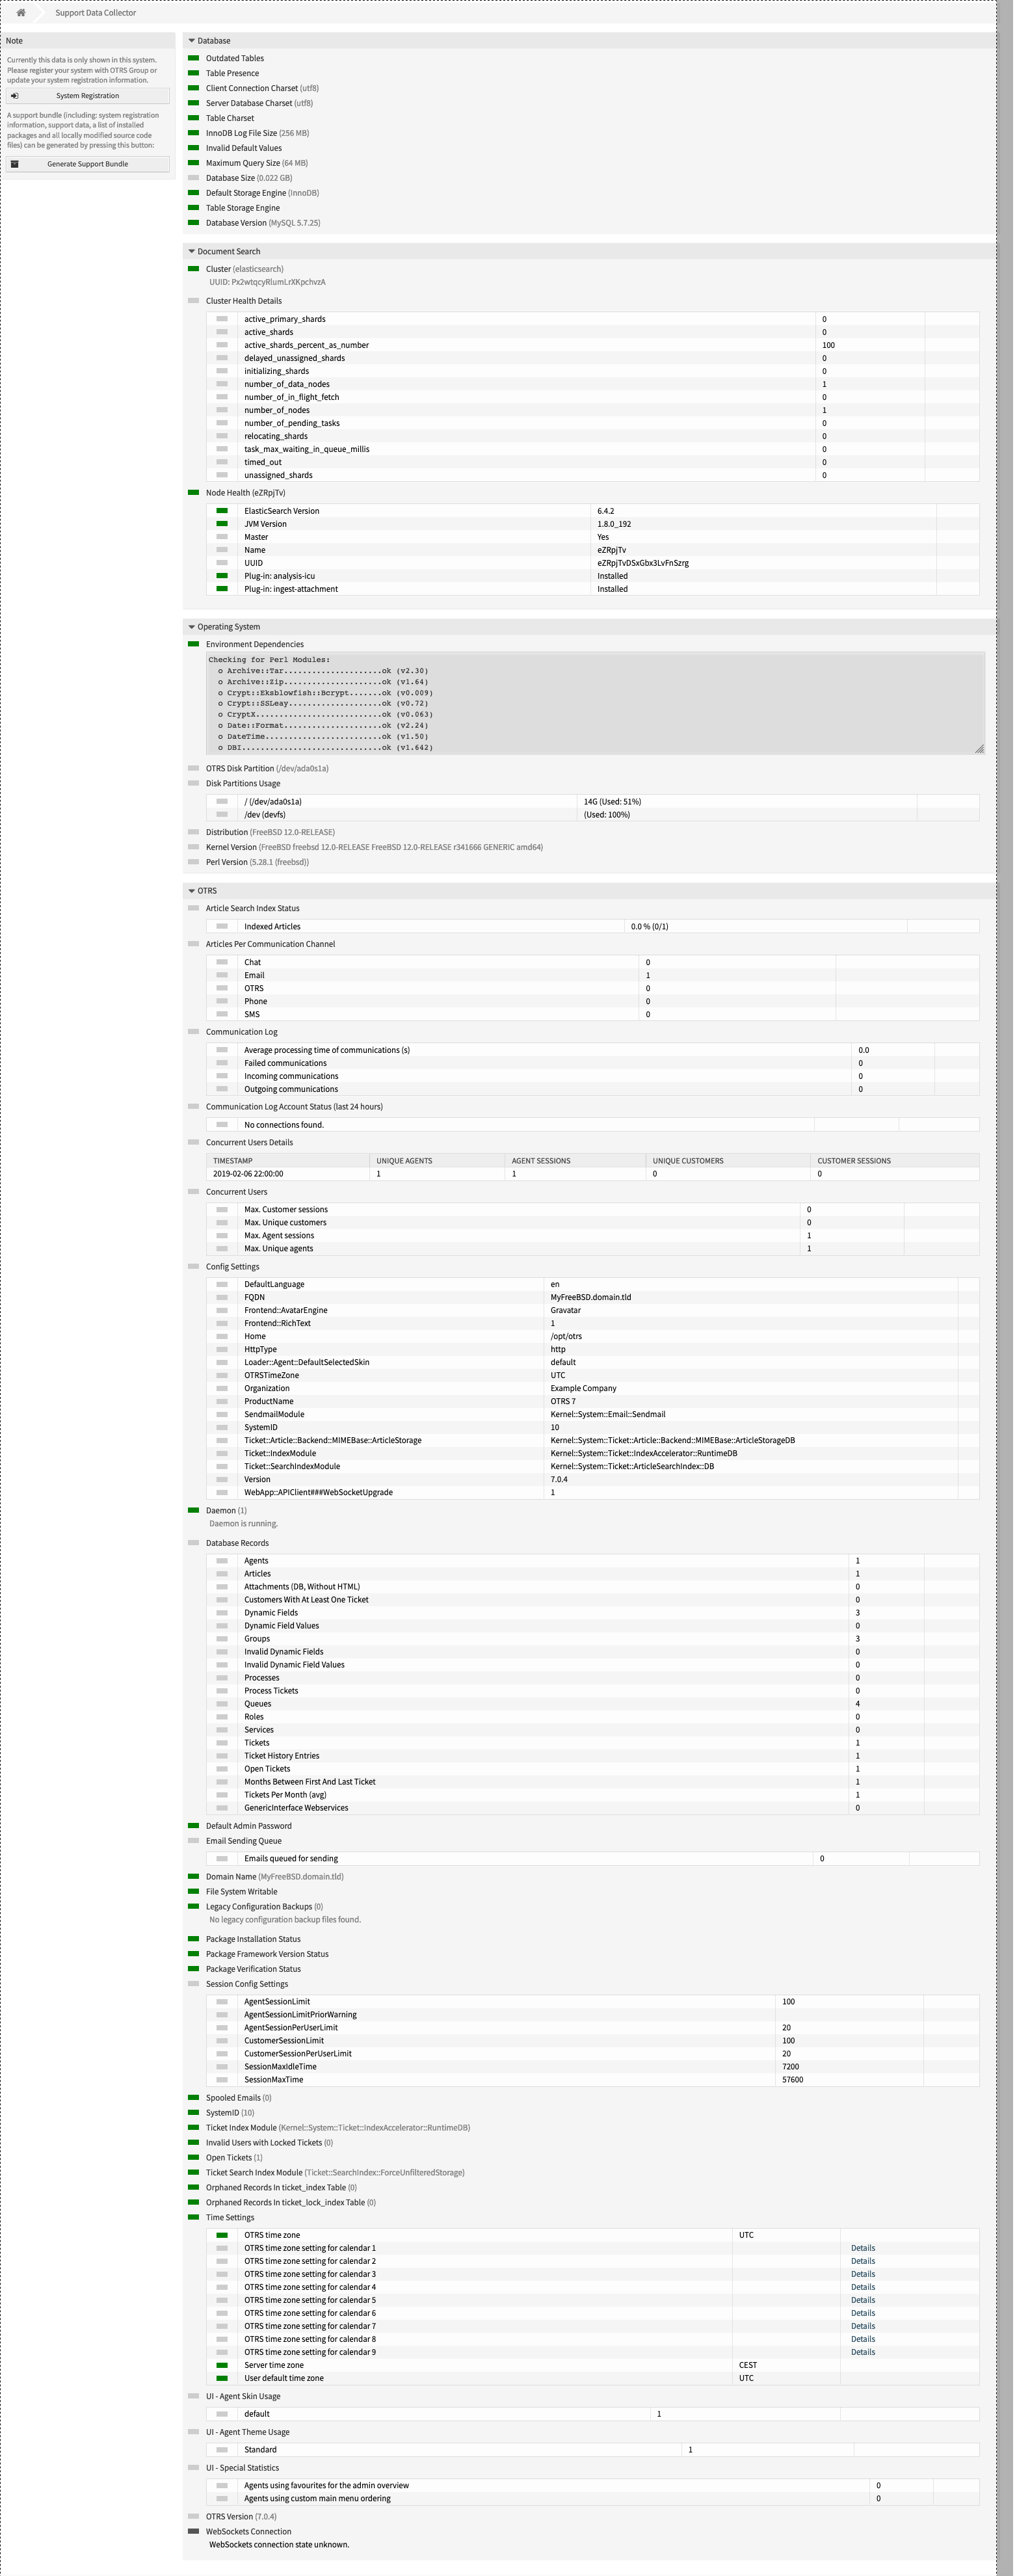
When you have finished, restart the webserver. As a final step, check the Support Data Collector:
Running FreeBSD is appealing, affordable and accessible for all, and it certainly won’t get in your way of using OTRS. The six steps above offer a high-level overview of how to run OTRS on FreeBSD, but if you have any difficult or are interested in more detailed instructions, review the official OTRS installation documentation at:

https://doc.otrs.com/doc/manual/installation/stable/en/content/installation.html#step-9-start-the-otrs-daemon-and-web-server.

otrs 7 freeBSD all green

The post Running OTRS on FreeBSD appeared first on The OTRS Blog.

Mail (Request) Forwarding à la Post Office

$
0
0

Sometimes spring cleaning just isn’t enough. You’ve changed the wallpaper, painted the fence, but it’s just not doing it. Moving is a happy-sad event, and it’s not always easy.

Questions that may arise when working with older installations are:

Should we make a clean cut from the old OTRS installation and start a new?

  • New queue and services
  • New users, groups, roles
  • etc.

What about the old tickets? How to deal with them?

Before you let the task of leaving the old behind and moving to new horizons, overwhelm you read further…….

The biggest issue you face after deciding to start a fresh with OTRS is: How do we handle requests which are still open? How do we redirect our mail, without loosing contact with the requests which were a part of the old system and still need answering?

You surely do not want to work out of two different systems. Also, changing the email addresses after all those years of having your customers write you at the current address may not be desirable.

How do you have your cake and eat it too?

The postal service of most countries offer mail forwarding. This means after a move, your current address will forward mail to your new address. In this proof-of-concept we will arrange for something similar. Your new OTRS should allow the customer to use old ticket numbers while providing the agents access to the previous conversation thread.

OTRS realizes this using the feature External Ticket Number Recognition

One thing we need is to understand the ticket number structure. . Each OTRS is individual. You can

  • define the type of ticket number to be used (NumberGenerator),
  • make it unique (SystemID),
  • define the identifier for the ticket number (Hook),
  • and make it a bit more readable (HookDivider – not depicted below).

These properties allow OTRS to identify if this is a ticket number or just some random collection of identifiers in the subject (or body) of a message.

A ticket number.

Ticket Number Disection


If the one of the following: Hook, HookDivider, or Number do not match, then it’s not a valid ticket number. If all of these things match, then the SystemID comes into play. This is where we will latch on to in a moment. A post office forwards its mail to the new address based on the registered last address. Our registered last address is the old SystemID.

This is where the example of the post office starts to crumble in relation to what we are trying to achieve, so let’s leave this analogy for now.

When your new system is up and running, it’s crucial that a new SystemID is chosen. All of your new mails are being polled by the new system. Since the new SystemID is not found in the ticket number (as is the number itself not registered) new tickets are being created for old requests, and you have no idea what the old tickets have for content. In comes external ticket number recognition and dynamic fields.

By configuring external ticket number recognition you can process all new mails to look for the old pattern. The key here is the SystemID, as this is the same in all tickets. When this pattern is found OTRS saves the ticket number in a dynamic field (done automatically by OTRS for tickets not already containing an external ticket number). The dynamic field is configured to link to your old (archive) system, so that the conversation is not lost. Agents can read things from the past in the old system, but they will answer from your new system.

At this point, the new ticket number is connected via the dynamic field to the old ticket number. Your customer users can then respond to the new request using the old ticket number, or the new ticket number. Eventually, all the old requests will be closed in the new system.

The only requirement you have, is to keep the old system alive so that your agents can quickly reference any past conversations via the hyperlinked dynamic field.  In the example below you will see that the number is parsed from the incoming subject matched to the field OTRS4ID and the conversation is placed in the new ticket with this matching number keeping old tickets and new tickets together.

This use case is also applicable when moving part of your teams to a separate OTRS to keep systems more manageable.

Need more information, or want help leaving your older ((OTRS)) community edition for a bright new shiny OTRS, give us a ring at sales@otrs.com.

Thanks for reading!

((enjoy))

Your Truly,

///shawn

“The great pleasure in life is doing what people say you cannot do.”,

The post Mail (Request) Forwarding à la Post Office appeared first on The OTRS Blog.

Customer User Self-Administration

$
0
0

In past articles we’ve talked about process management and web services. Combining these two can make for interesting new features, without the need for new development. For example, OTRS doesn’t offer a solution to let customers administer their own customer users by default. Combining process management with web services, however, can allow you to add such a feature to your installation.

Just gimme the core message.

Using OTRS and the OTRS feature add-on ticket invoker, you can create a user-driven RPC-backed process to allow customer users to create and register their own customer users.


Process Map


Above you see a process which allows the customer user to enter customer user details (dynamic fields). The process will then trigger the Generic::RPC (see Remote Administration per REST.) To call the Kernel::System::CustomerUser::CustomerUserAdd and create the customer.

If any error occurs, the ticket will be closed and the process will end. If not, the process ticket is closed successfully.

When a customer user leaves the company, the customer user administrator can easily find the closed tickets and remove the user by using the customer user maintenance activity. The customer user is then marked for removal and Kernel::System::CustomerUser::CustomerUserUpdate will set the user to invalid.

The web service setup is trivial and requires some mapping.

Web Service Details

Elements to be mapped for use with the Generic::RPC as follows:
        Source         => Hard Coded
        ID             => Mapped from DynamicField_UserLogin
        UserFirstname  => Mapped from DynamicField_UserFirstname
        UserLastname   => Mapped from DynamicField_UserLastname
        UserCustomerID => Mapped from current customer
        UserLogin      => Mapped from DynamicField_UserLogin
        UserEmail      => Mapped from DynamicField_UserEmail
        ValidID        => Mapped from DynamicField_ValidState
        UserID         => Mapped from current user
Mapping
Outgoing data from the Ticket to the Generic::RPC operation will be mapped and return data for error handling.
Outbound Mapping AddUser
<?xml version="1.0" encoding="UTF-8"?> <xsl:transform version="1.0" xmlns:xsl="http://www.w3.org/1999/XSL/Transform"> <xsl:output method="xml" encoding="utf-8" indent="yes" /> <!-- Don't return unmatched tags --> <xsl:template match="text()"/> <!-- Root template -->
    <xsl:template match="/">
        <RootElement>
            <UserLogin>wsusr</UserLogin>
            <Password>wsusr</Password>
            <Object>Kernel::System::CustomerUser</Object>
            <Method>CustomerUserAdd</Method>
            <Parameter>
                <Source>CustomerUser</Source>
                <UserLogin><xsl:value-of select="//Ticket/DynamicField[Name = 'UserLogin']/Value"/></UserLogin>
                <UserFirstname><xsl:value-of select="//Ticket/DynamicField[Name = 'UserFirstname']/Value"/></UserFirstname>
                <UserLastname><xsl:value-of select="//Ticket/DynamicField[Name = 'UserLastname']/Value"/></UserLastname>
                <UserEmail><xsl:value-of select="//Ticket/DynamicField[Name = 'UserEmail']/Value"/></UserEmail>
                <UserCustomerID><xsl:value-of select="//Ticket/CustomerID"/></UserCustomerID>
                <ValidID><xsl:value-of select="//Ticket/DynamicField[Name = 'ValidState']/Value"/></ValidID>
                <UserID>1</UserID>
            </Parameter>
        </RootElement>
    </xsl:template>
</xsl:transform>
Inbound Mapping AddUser (error handling)
<?xml version="1.0" encoding="UTF-8"?>
<xsl:transform version="1.0" xmlns:xsl="http://www.w3.org/1999/XSL/Transform">
    <xsl:output method="xml" encoding="utf-8" indent="yes" />
    <xsl:template match="/RootElement">
        <xsl:choose>
            <xsl:when test="not(Result)">
                <RootElement>
                    <Ticket>
                        <DynamicField>
                            <Name>ReqestResponse</Name>
                            <Value>UnknwonError</Value>
                        </DynamicField>
                        <State>closed unsuccessful</State>
                    </Ticket>
                </RootElement>
            </xsl:when>
            <xsl:otherwise>
                <RootElement>
                    <Ticket>
                        <DynamicField>
                            <Name>ReqestResponse</Name>
                            <Value>UserAdded</Value>
                        </DynamicField>
                    </Ticket>
                </RootElement>
            </xsl:otherwise>
        </xsl:choose>
    </xsl:template>
</xsl:transform>
Problems and Considerations
  1. A customer user will never know why a user couldn’t be created. Any error should be reported to the OTRS admin. Generally, it’s related to a duplicate UserLogin. It could also be a bad or duplicate UserEmail.
  2. Any customer can create a user for his company.
Workarounds
  1. To help customer users understand what’s happening, a status can be added, the ticket closed, and a note to “contact the admin of the system for more details” can be created.
  2. Use the ACL to limit the process to a specific user or users.
  3. Company tickets can be limited to only specific users.
Dynamic Fields Needed for Mapping

Name:  UserLastname
Label:  User Last Name
Type:   Text
Object: Ticket

Name:   UserFirstname
Label:    User First Name
Type:    Text
Object: Ticket

Name:   UserLogin
Label:   User Login
Type:    Text
Object: Ticket

Name:   UserEmail
Label:    User Email
Type:     Text
Object:  Ticket

Name:   ValidState
Label:    User Valid
Type:     Dropdown
Object:  Ticket

Name:   ReqestResponse
Label:    Request Response
Type:     Text
Object:  Ticket


Need assistance? Contact sales@otrs.com.

Summary (TL/DR)

Some missing features can be built using a loopback request to OTRS’ internal Perl API. Using processes to control these gives you even more power.

The post Customer User Self-Administration appeared first on The OTRS Blog.

Viewing all 45 articles
Browse latest View live